Table of Contents
- KonaKart Administration Application
- Launching the Admin App
- Configuring KonaKart for HTTPS / SSL
- Editing the KonaKart Configuration Files
- Changing the Editable File List in the Admin App
- KonaKart Properties Files
- Configuration of Messages
- Logging
- Internationalization of KonaKart
- Changing the Logo on the KonaKart Admin Application
- Changing the Date Format in the KonaKart Application
- Formatting of Addresses
- Email Configuration
- Modifying the Email Templates
- Using an External Email Delivery Service
- Using a email barcode generator
- Using Google reCAPTCHA Service
- Search Engine Optimization (SEO) Features
- Sitemap Generation
- Caching
- Adding Custom Functionality to the Admin App
- Searching with wildcards
- Case In-Sensitive Searching
- Making something happen when a product needs to be reordered
- Making something happen when the state of an order changes
- PDF Invoices
- Activating a Promotion
- Testing a Promotion
- Applying Promotions to Products
- Displaying Coupon Entry Fields in your Store
- Configuring Digital Downloads
- Configuring Bookable Products
- Import/Export of KonaKart Data
- Multiple Prices for Products
- Future Product Prices
- Sale Price
- Variant Pricing
- Tier Pricing
- Dynamic product prices
- Tax Configuration
- Validation of Order Totals
- Multiple Quantities for Products
- Default Sort Order for Products
- Bundle Configuration
- Product Options
- Product Tags
- Managing Product Reviews
- Using CLOBs for Product Descriptions
- Credit Card Refunds
- Saving and Editing of Credit Card details
- Edit Order Number and Custom Fields
- Shippers and Shipments
- Wish Lists
- Gift Registries
- Gift Certificates
- Enable Gift Certificates
- Creating a Gift Certificate
- Creating a new Admin App User
- Creating New Roles
- Default Customer Configuration
- Making Customers Invisible
- Customer Groups
- Auditing
- Forgotten Password
- Set User Password
- Authentication with Username or Telephone
- Double Opt-In for Registration and Newsletter
- Custom Credential Checking
- Custom Credential Checking - LDAP
- Multi-Store Configuration and Administration
- Scheduling in KonaKart
- Deletion of Expired Data
- Data Integrity
- Configuring KonaKart to use Analytics Tools
- Setting up RMI Services
- Integrating a Java Message Queue
- kkCmd - Command line tool
- Changing the standard password encryption algorithm
This chapter seeks to explain the many different ways in which KonaKart can be configured.
Most of the Administration and Configuration of KonaKart can be carried out using the KonaKart Administration Application.
KonaKart includes a sophisticated browser based administration application. It uses AJAX technology to provide a snappy user interface while the maintaining the advantages of running the application from a browser. Each application window has an on-line help facility which is the first place to look in order to understand the available functionality.
It incorporates a security subsystem with role based security. Each user can be assigned one or more roles that determine access to the available functionality with read / insert / edit and delete granularity. The username / password based access, has the facility to block users for a programmable period after a number of unsuccessful login attempts.
Auditing may be enabled for all Admin App API calls with two levels of detail. All audit data is stored in the KonaKart database and may be browsed and filtered through the Admin App.
The admin application is fully internationalized and can be translated via a message catalog. Each panel has an online help facility that explains the functionality available.
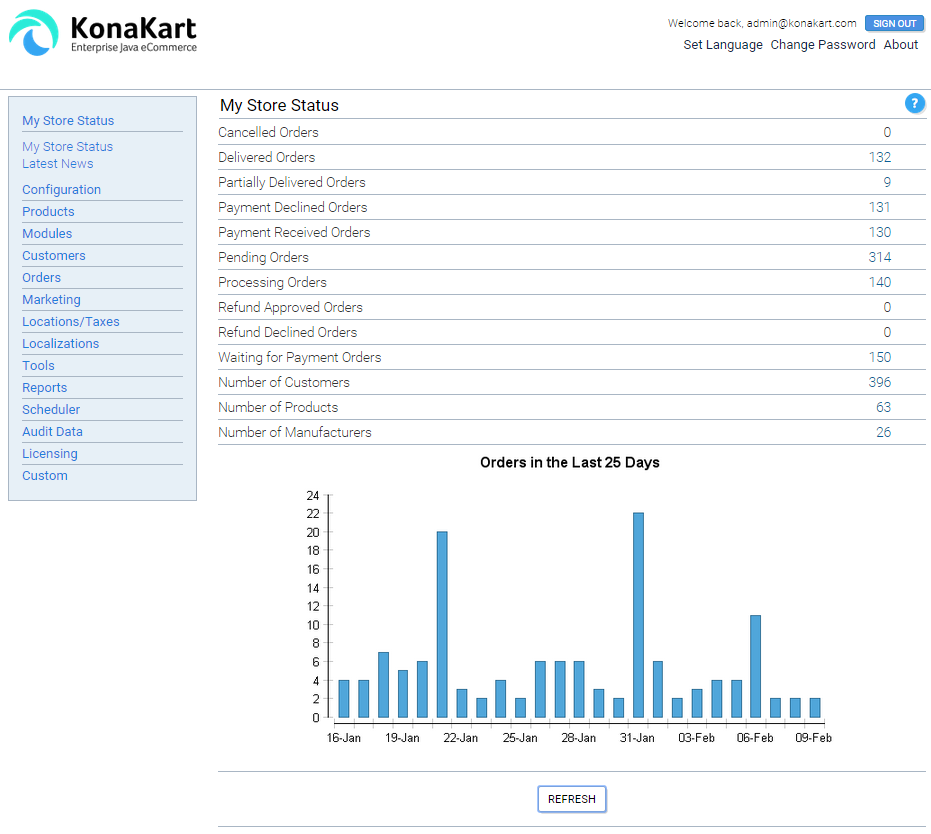
KonaKart Admin Application - Status View
The main features of the admin app are:
- Store status summary (i.e. number of orders, number of products etc.)
-
Store maintenance
- Create new stores
- Edit existing stores
- Change state of stores (i.e. enable / disable, maintenance mode)
- Delete stores
- Maintenance of configuration variables
-
Product maintenance
- Product Category maintenance
- Product Option maintenance
- Product Manufacturer maintenance
- Product Tag Group and Tag maintenance
- Product Payment Schedule maintenance
- Product Review maintenance
- Product Custom Attribute Template and Custom Attribute maintenance
- Product Catalog maintenance
- Miscellaneous Item Type and Item maintenance
- Installation and removal of modules (payment, shipping, order total and other modules)
-
Customer maintenance
- Send email
- Role maintenance
- Reset Password
- Login to eCommerce application on behalf of a customer. Useful for call center applications.
- Customer Group maintenance
- Customer review maintenance
- Customer booking maintenance
-
Orders
- Generate invoice (template based)
- Generate packing slip (template based)
- Change state of order and send email
- View all payment gateway notifications associated with order
- Manage returns
-
Marketing
- Promotion maintenance
- Coupon maintenance
- Customer Tag and Expression maintenance
- Customer Communications where you can send template based eMails to all customers, to all customers who have requested to receive the newsletter, to customers that have asked to be notified about any updates for a particular product and to customers belonging to a particular group or satisying a certain expression.
- Create Mailing Lists for import into 3rd Party email systems (such as MailChimp) containing defined segments of your customers.
- Content Management.
-
Locations / Taxes
- Country maintenance>
- Zone maintenance
- Tax Area maintenance
- Tax Class maintenance
- Tax Rate maintenance
-
Localizations
- Currency maintenance
- Language maintenance
- Message maintenance
- Order Status maintenance
- Address Format maintenance
- Reports
- View Audit Data
-
Tools
- Delete expired sessions
- Refresh caches
- Manage Solr search engine
- Custom panels - Add custom panels that implement your custom business logic.
The KonaKart admin application provides powerful reporting functionality through integration with BIRT , the very popular open source Business Intelligence and Reporting Tool. Although an ever expanding list of useful reports is provided in the KonaKart download, the integration is done in such a way that allows users and system integrators to develop and customize their own reports by using the BIRT Eclipse based development environment.
By default the BIRT Viewer webapp is protected by a configurable layer of security that ensures that only suitably-authorised Administrators with active sessions are permitted to execute the reports using the BIRT Viewer webapp.
To disable the security completely you can set the "securityEnabled" initialisation parameter to "false" in the birtviewer web.xml.
When security is enabled, a user is allowed access to the reports through BIRT viewer if and only if:
- A valid sessionId is passed as a parameter to the birtviewer webapp. A valid sessionId is one that exists in the database for the specified user and store and that it hasn't expired.
- The user has been granted access to run the reports through role-based security.
To be able to run the reports the user must be assigned a role that permits that user to execute the reports. This is defined on the privileges screen of the role-based security section of the Admin Application (Under Customers >> Maintain Roles).
The "custom1" flag must be unticked to allow the user to run the reports:

Reports Privileges
You can easily customise the pages that users are redirected to in the event of session expiry and unauthorised access. The URLs of the pages that are used are defined in the birtviewer webapp's web.xml file.
The BIRT Viewer servlet needs access to the database in order to authenticate the user. The location of the properties file containing the database credentials is defined in the birtviewer web.xml in the ViewerServlet servlet tag.
Many panels in the admin application may be configured to display or hide certain fields and buttons. The configuration is set by selecting a role in the Maintain Roles panel and then by clicking on the Privileges button on the same panel. A pop-up panel should appear similar to the image shown below:
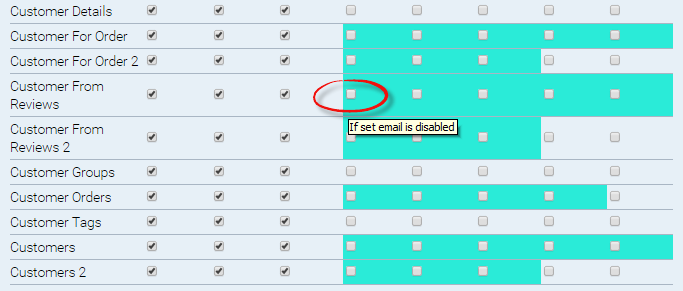
Role Privileges
Each panel has a number of checkboxes to assign privileges. The standard privileges are Insert, Edit and Delete, although some panels have custom privileges which are highlighted in green. In order to understand what a green highlighted checkbox refers to, a yellow popup will appear when you move your mouse over it. For example the Edit Order panel has a couple of configuration options which are:
- Enable the read and edit of credit card details.
- Enable the read and edit of custom fields, order number and tracking number.
As a security precaution certain API calls and Admin Console functions are disabled when you first install KonaKart. This cautious initial configuration allows the administrator to enable certain more sensitive functionality only when the consequences of doing so are understood and the environment is secure.
To enable these API calls and in doing so enable the functions in the Admin Console that rely on these, you must uncomment and set these quantities in the konakartadmin.properties file to "true":
# -----------------------------------------------------------------------------------
# Enable / Disable File-I/O API calls.
# By default the following File-I/O API calls are disabled:
#     deleteFile
#     copyFile
#     copyFiles
#     renameFile
#     renameFiles
#     getFileContents
#     saveFileContents
# These are disabled as a security precaution because their use in an unprotected
# default installation can allow an intruder to modify files on your system that are
# accessible to the account running KonaKart.
# Before enabling these to gain full operation of the File-I/O API calls (including
# their use from the KonaKart Admin Console) be sure that you take precautions to
# protect your installation.  For example:
# Always change the default passwords of the Admin users
# Always run the Admin Console under SSL (HTTPS)
# Restrict access to certain functions in the Admin Console (such as Edit Config Files)
# to only those Admin users who need access to these functions.
# If possible, only run the Admin Console inside your firewall or on a secure VPN

#konakart.api.copyFile.enabled                     = true
#konakart.api.deleteFile.enabled                   = true
#konakart.api.renameFile.enabled                   = true
#konakart.api.getFileContents.enabled              = true
#konakart.api.saveFileContents.enabled             = true

# Use the permittedLocations parameter to define locations that you allow for file I/O
# operations. (File I/O operations include copyFile, renameFile, deleteFile, and saveFileContents)
# Use a space-separated list of regular expressions to define the permitted locations
# (use the forward slash as a directory symbol even if you are on Windows).

konakart.permittedLocations = .*/[Kk]ona[Kk]art/.*/reports/.* \
                              .*/[Kk]ona[Kk]art/webapps/konakart/images/.* \
                              .*/[Kk]ona[Kk]art/batchlogs/.* \
                              .*/[Kk]ona[Kk]art/data/.* \
                              .*/[Kk]ona[Kk]art/templates/.*.vm \
                              .*/[Kk]ona[Kk]art/logs/.*
For example, if you leave the konakart.api.saveFileContents.enabled property commented or set to false an Administrator will not be able to, edit Config Files, Velocity Templates, BIRT reports or Mailing Lists.
To restrict file I/O operations only to permitted locations you can set these in konakartadmin.properties file (see above example).
To restrict digital download access only to permitted locations you can set these permitted locations in the konakart.properties file as follows:
# Use the permittedLocations parameter to define locations that you allow for file
# I/O operations. (File I/O operations include the access to digital download files).
# Use a space-separated list of regular expressions to define the permitted locations
# (use the forward slash as a directory symbol even if you are on Windows).

konakart.permittedLocations = .*/[Kk]ona[Kk]art/.*/digitalDownload/.*
To restrict access only to permitted locations for the DisplayFile servlet in the konakartadmin webapp you can set these permitted locations in the servlet parameter of the DisplayFile servlet in the konakart web.xml as follows:
<!--
	DisplayFile
	Use the permittedLocations parameter to define locations that you allow to display.
	Use a comma-separated list of regular expressions to define the permitted locations
	(use the forward slash as a directory symbol even if you are on Windows).
	If there is an attempt to display a file at a path that does not contain one of the
	permittedLocations strings an Exception will be thrown.
-->
<servlet>
	<servlet-name>DisplayFile</servlet-name>
	<servlet-class>
		com.konakartadmin.servlet.DisplayFile
	</servlet-class>
	<init-param>
		<param-name>permittedLocations</param-name>
		<param-value>.*/pdf/.*</param-value>
	</init-param>
</servlet>
To restrict access only to permitted locations for the FileUpload servlet in the konakartadmin webapp you can set these permitted locations in the servlet parameter of the FileUpload servlet in the konakart web.xml as follows:
<!--
	FileUpload
	Use the permittedLocations parameter to define locations that you allow to upload to.
	Use a comma-separated list of regular expressions to define the permitted locations
	(use the forward slash as a directory symbol even if you are on Windows).
	If there is an attempt to upload a file to a path that does not contain one of the
	permittedLocations strings an Exception will be thrown.
-->
<servlet>
	<servlet-name>FileUpload</servlet-name>
	<servlet-class>
		com.konakartadmin.servlet.FileUpload
	</servlet-class>
	<init-param>
		<param-name>permittedLocations</param-name>
		<param-value>
			.*/[Kk]ona[Kk]art/data/.*,
			.*/[Kk]ona[Kk]art/digitalDownload/.*,
			.*/[Kk]ona[Kk]art/pdf/.*,
			.*/[Kk]ona[Kk]art/.*/reports/.*/.*rptdesign,
			.*/[Kk]ona[Kk]art/webapps/konakart/images/.*
		</param-value>
	</init-param>
	<init-param>
		<param-name>permittedFileTypes</param-name>
		<param-value>
			gif,jpg,jpeg,pdf,png
		</param-value>
	</init-param>
</servlet>
To only allow a certain set of file types to be uploaded by the FileUpload servlet you can set the permittedFileTypes parameter (see above). The default setting allows gif, jpg, jpeg, pdf and png file types to be uploaded.
You can further restrict the types of files that can be uploaded using the Admin Console by setting either of the two configuration properties in the konakartadmin_gwt.properties file as follows:
# Only allow image filenames with these extensions (case insensitive) to be uploaded
# Default is JPG JPEG GIF PNG
#fbc.allowed.image.types = JPG JPEG GIF PNG

# Only allow digital download filenames with these extensions (case insensitive) to be uploaded
# Default is PDF JPG JPEG GIF PNG
#fbc.allowed.dig.download.types = PDF JPG JPEG GIF PNG
Be aware that only images of the following types are supported: PNG, JPG, JPEG and GIF.
Filters are a Business and Enterprise-Only feature that can be used to filter records on a per user basis. Initially the filtering is only supported in the base product for Orders.
The idea is that you can create filtering rules that define for each user which orders they can see. This feature can be used to implement order processing workflow.
You maintain the filtering rules on the "Filter" panel as illustrated below:
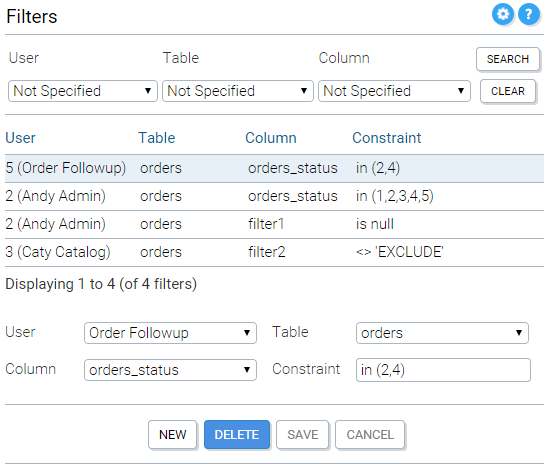
Filter Panel
If filters (one or more) are defined for a particular user, when that user executes a search for Orders (using the KKAdminIf API), the filters are added to the order query.
There are some special-purpose "filter" columns on orders to help you configure your filtering rules. These are filter1, filter2 and filterDecimal1 on the orders table (it is your responsibility to set these as you wish during your order processing).
You don't have to restrict your filters to using the special filter columns. You can use other columns on the orders table as required. A typical case would be to create filters which use the orders_status column to restrict access to orders of a certain set of states for different users. This could be used to implement order processing workflow in either the Admin Console or your own workflow system that uses the KKAdminIf APIs to retrieve orders.
Filters also have custom fields which may be used for any custom purposes. By default these are hidden from view in the Admin Console but can be enabled using FBC (File-Based Configuration) by setting the relevant porperties (fbc.kk_panel_filters.hide_custom1 and fbc.kk_panel_filters.hide_custom1 in this case) to false.
It is possible to configure the Admin Application on a global basis by defining certain properties in the konakartadmin_gwt.properties file (which can be found in the classes directory of the konakartadmin webapp).
The configurations you make in this file-based technique are for every user of the Admin App (deployed in the associated webapp) no matter what roles are defined for each user.
By default, the file-based configuration ("FBC") properties are commented out and as such have no effect. To enable them you need to uncomment the relevant line(s).
The supported configuration properties are defined in the konakartadmin_gwt.properties file and will be updated over time. Here is a sub-set of the currently-supported configuration options:
# ---------------------------------------------------------------------------------
# Enterprise Feature
# File-based Configuration
# These settings make global changes to the Admin App for all users

#fbc.kk_panel_communications.hide_expression_selection      = true

# Use this to set the default for the "Use Customer Language" checkbox
# (default is true if not defined)
#fbc.kk_panel_communications.default_use_cust_lang          = false

#fbc.kk_panel_editProduct.hide_attributes_tab               = true

#fbc.kk_panel_products.hide_name_show_sku                   = true

#fbc.kk_panel_editCustomer.address.hide_city                = true
#fbc.kk_panel_editCustomer.custom.hide_custom1              = true

#fbc.kk_panel_editCustomer.personal.hide_customerGroup      = true
#fbc.kk_panel_editCustomer.personal.hide_dateOfBirth        = true
#fbc.kk_panel_editCustomer.personal.hide_fax                = true
#fbc.kk_panel_editCustomer.personal.hide_first_name         = true
#fbc.kk_panel_editCustomer.personal.hide_gender             = true
#fbc.kk_panel_editCustomer.personal.hide_last_name          = true
#fbc.kk_panel_editCustomer.personal.hide_newsletter         = true
#fbc.kk_panel_editCustomer.personal.hide_state              = true
#fbc.kk_panel_editCustomer.personal.hide_tel                = true
#fbc.kk_panel_editCustomer.personal.hide_tel_other          = true
#fbc.kk_panel_editCustomer.personal.hide_type               = true
#fbc.kk_panel_editCustomer.personal.hide_visibility         = true

#fbc.kk_panel_editCustomer.hide_address_tab                 = true
#fbc.kk_panel_editCustomer.hide_custom_tab                  = true
#fbc.kk_panel_editCustomer.hide_points_tab                  = true
#fbc.kk_panel_editCustomer.hide_tags_tab                    = true

#fbc.g.kk_panel_login.enter_store_as_text_not_droplist      = true

#fbc.kk_panel_promRules.hide_categories                     = true

# Hide the Print button on the Order Invoice view
#fbc.kk_display_panel.invoice.hide_print_btn                = true

# Stops logout after a browser refresh
#fbc.save_session_in_cookie                                 = true

# etc...
# check your own kit to discover the properties available in your version
After uncommenting a property it is necessary to refresh the caches (you can do this from the Tools section of the Admin App) then refresh your browser so that the changes to the Admin App User interface will be enabled.
It is possible to define the way images are created during the image upload process using File-based Configuration.
Currently, the supported image extensions are: JPG, JPEG, GIF and PNG.
By default, every time a product image is imported, 4 images are created from the imported image scaled to 4 different sizes. The number of images created and the sizes of each can be defined in konakartadmin_gwt.propeties. Other characteristics (such as maximum number of images to display per product and directory structure) can also be defined.
The supported configuration properties are defined in the konakartadmin_gwt.properties file and will be updated over time. Here are the currently-supported configuration options for image uploads:
# Image Scaling
# Only relevant to the images.tab.version = 2 (new images tab introduced with v6.5.0.0)
# Default, if not specified is "big;360;360 medium;150;150 small;80;80 tiny;60;60"
#
# For each size defn this is   name;height;width
#
# This means that for any uploaded image these four images are created with the following
# characteristics:
# Image 1:  {product_UUID}_1_big.XXX (360x360 pixels)
#        :  {product_UUID}_1_medium.XXX (150x150 pixels)
#        :  {product_UUID}_1_small.XXX (80x80 pixels)
#        :  {product_UUID}_1_tiny.XXX (60x60 pixels)
# XXX = the original file extension (used if add_extension is not set to false - see below)
#
# Retaining the original aspect ratio:
# Use big;;300     to create an image with width 300 pixels and unspecified height to
#                  retain aspect ratio
# Use big;200;     to create an image with height 200 pixels and unspecified width to
#                  retain aspect ratio
#
# Create a version identical to the original:
# Use big;;        to create an image with the same height and width as the original

# For best results order the images definitions from large to small
#fbc.kk_panel_editProduct.images.options = big;360;360 medium;150;150 small;80;80 tiny;60;60

# Defines whether or not to append a period and an extension to the generated image file
# names:
#fbc.kk_panel_editProduct.images.add_extension              = false

# Defines how many images are displayed for editing on the Edit Product panel (default is 8)
#fbc.kk_panel_editProduct.images.max                        = 8

# Defines the depth of the directory tree used for constructing image file names (default
# is 4)
# If 0 is used, all images will placed in the same directory under the Image Base Path
# If >0 the file path is created by using directories named by the first n characters of the
# UUID
# The purpose of the directory tree for images is to avoid having too many files in each
# directory so you should choose use a high value for the depth if you have a very large
# number of images.
#fbc.kk_panel_editProduct.images.dir.depth                  = 4

# Defines the name of a directory that will be used to construct a filename for storing
# the product images.  This directory (defaults to "prod") will be added to the Image Base
# defined for the store.
# It can be left blank if you want no product image directory added at all.
#fbc.kk_panel_editProduct.images.dir.name                   = prod
It's better if you can decide what your image formats will be before you load all your images as the definitions only affect the scaling that takes place after product images are uploaded. Making a change to the image scaling and creation configuration parameters will not affect existing product images (but you can reload them if you wish).
It is possible to define where manufacturer images are created during the image upload process using File-based Configuration.
By default, manufacturer images are uploaded to a filename that is a concatenation of the image base path (a configuration variable defined in the Administration Application) a "manufacturer" image directory name (defined in File-based Configuration and defaulting to "manufacturer") and the filename itself. The target directory and filename (except the image base path) is displayed in the image upload dialogue after selecting an image from the local file system. This directory and filename can be modified to change the target location that the file will be uploaded to.
The manufacturer directory configuration property is defined in the konakartadmin_gwt.properties file as follows:
# Defines the name of a directory that will be used to construct a filename for storing the
# manufacturer images.  This directory (defaults to "manufacturer") will be added to the
# Image Base defined for the store.  It can be left blank if you want no manufacturer image
# directory added at all.
#fbc.kk_panel_manufacturers.images.dir.name                   = manufacturer
The manufacturer directory configuration property is only used for creating new images. Once the image has been uploaded the file location is saved in the database in the manufacturer table.