This feature of KonaKart can be used to integrate with Google Analytics or any other analytics engines assuming their requirement is simply to insert some code into each page. Indeed, it's also possible to use this feature to insert some code into each page for any other purpose that you might have!
The standard Struts2 based storefront application integrates Google Analytics with enhanced commerce features. By default, the following events are tracked:
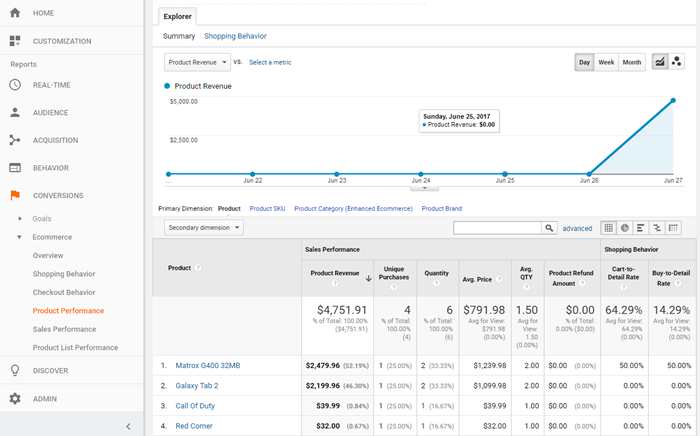
When a customer visits a product details page, the product information is sent to Google.
When a customer terminates a checkout, the details of the order are sent to Google.
When a product is added or removed from the cart, the product name and id is sent to Google.
The steps required in order to activate the analytics are quite simple. First you need to create an account with Google Analytics - see http://www.google.com/analytics/ for details.
KonaKart - Google Analytics Integration
Following Google's guidelines, create an account for your KonaKart site. Once the account has been created, it’s important that you enable eCommerce and advanced eCommerce for the account.
Take note of the javascript "Tracking Code" that Google generates for your account. You will need this to configure KonaKart (see below).
KonaKart will insert the Google Analytics "Tracking Code" for your site into every page of the KonaKart store. For KonaKart to use your own unique code, you will have to copy this and add it to your Messages.properties file (or your own locale version of this file, as appropriate).
You must add the text of the "Tracking Code" on one line as the value of the analytics.code property. It may be convenient to use the default tracking code value that is included by default - but if you do this you must ensure that you replace the dummy UA-9999999-1 identifier with your own.
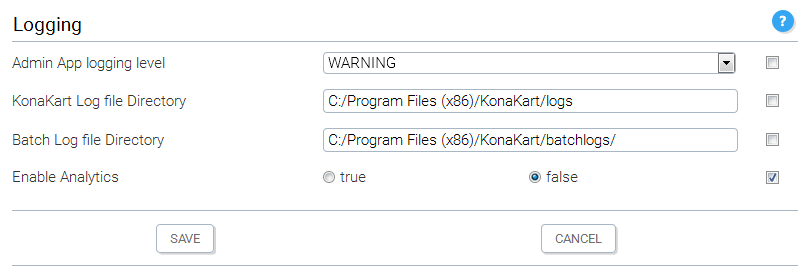
Once the analytics code is defined in the Messages.properties file you have to enable analytics in the KonaKart Admin App. You can find this configuration parameter under the Configuration >> Logging section.
Now sit back and wait for the data to be collected and enjoy studying the reports that Google produces!
Be patient, however, because data does not appear in your Google account for 24 hours or more.
This feature of KonaKart can be used to integrate with other analytics engines assuming their requirement is simply to insert some code into each page. If you require more detailed reporting as has been implemented using the enhanced commerce features of Google Analytics, then you can search for and modify the JavaScript used to send data to Google, in order to send data to your analytics engine instead.
For KonaKart to insert your own code into each page, you have to define it in your Messages.properties file (or your own locale version of this file, as appropriate).
You must add the code on one line as the value of the analytics.code property overwriting whatever is defined there by default.
Once your code is defined in the Messages.properties file, you have to enable analytics in the KonaKart Admin App. You can find this configuration parameter under the Configuration >> Logging section. Whilst you may not actually be using the feature for "analytics", you still need to enable this setting so that the code is inserted in each page.