This section explains how to create a new Promotion module for KonaKart using its module plug-in framework. The process for creating a new promotion module is similar to that for creating a new payment module described above so here we'll concentrate mainly on how to define the data entry configuration widgets for a promotion module.
The first important step is to study the existing Promotion modules to see which one looks to be the closest fit to the type of promotion you are considering. This step is very important and will save you a great deal of time if you pick a close match. For example, TotalDiscount.java provides a percentage or amount discount on the total of the order and ProductDiscount.java provides a percentage or amount discount for individual products. These could be good starting points for your custom promotion.
If you decide that the TotalDiscount promotion is a good starting point then the next step is to copy the following promotion directories and contents:
modules/src/com/konakart/bl/modules/ordertotal/totaldiscount
modules/src/com/konakartadmin/modules/ordertotal/totaldiscount
to
modules/src/com/konakart/bl/modules/ordertotal/mytotaldiscount
modules/src/com/konakartadmin/modules/ordertotal/mytotaldiscount
Rename the files from TotalDiscount*.* to MyTotalDiscount*.*
MyTotalDiscount.java under the konakart directory contains the code that runs in the storefront and calculates the promotion discount. MyTotalDiscount.java under the konakartadmin directory is used to define the parameters for configuring the promotion.
Next, we need to decide which configuration options we will allow an administrator to change when creating a new promotion. New promotions are created from the Admin App under Marketing >> Promotions. You pick a promotion type from the drop list and a number of entry fields appear into which you can enter data that configures the promotion, such as the actual discount amount or percentage value.
The configuration parameters are defined in the file modules/src/com/konakartadmin/modules/ordertotal/mytotaldiscount/MyTotalDiscount.java . Each configuration attribute must have a unique key. The first two attributes are similar for all promotion modules since they define whether the module is active and the sort order when displayed in a list in the Admin App under Modules >> Order Totals.
    configs[i] = new KKConfiguration(
        /* title */"Minimum Order Value",
        /* key */"MODULE_ORDER_TOTAL_TOTAL_DISCOUNT_MIN_ORDER_VALUE",
        /* value */"custom1",
        /* description */"The discount only applies if the total of the order,"
                + " equals or is greater than this minimum value",
        /* groupId */groupId,
        /* sortO */i++,
        /* useFun */"invisible",
        /* setFun */"double(0,null)",
        /* dateAdd */now);
Let's look at the example above in order to understand the configuration details.
title - The label for the data entry widget when configuring the promotion. If an entry in the format cfg.title.key exists in the message catalog then the label is retrieved from the catalog. e.g. cfg.title.MODULE_ORDER_TOTAL_TOTAL_DISCOUNT_APPLY_BEFORE_TAX = Apply before tax.
key - The key must be unique. All of our modules tend to follow a naming convention as you can see in the example above.
value - Each promotion can have up to 10 configuration parameters. The value must be in the range "custom1" to "custom10".
description - The description is what a user sees in the Admin App as floatover help when the mouse is over the label of the data entry widget. If an entry in the format cfg.desc.key exists in the message catalog then the description is retrieved from the catalog. e.g. cfg.desc.MODULE_ORDER_TOTAL_TOTAL_DISCOUNT_APPLY_BEFORE_TAX = If set to true, the discount is calculated on the amount before tax.
groupId - Set to 6 for promotion modules.
sortO - This should be left as i++ so that the data entry widgets in the UI match the sort order in which they are defined in the file.
useFun - Set to "invisible" for promotions so that they don't appear when activating the module.
setFun - This is an important attribute since it defines what the data entry widgets will look like and allows you to add validation. Valid values are:
integer(min,max) where min and max may be numbers or set to null. i.e. integer(10,null) checks that the integer has a minimum value of 10 or above. Integer(null,null) just checks that the value entered is an integer without doing any range checking.
double(min,max) using the same logic as explained above for decimal numbers.
string(min,max) using the same logic as explained above for the length of the string.
choice('true','false') creates a radio button panel with the options of true and false.
choice('msg.small','msg.medium','msg.large') creates 3 radio buttons where the labels are looked up in a message catalog. In this case, the text displayed is looked up from the message catalog, whereas the values saved are always msg.small, msg.medium and msg.large regardless of the language.
choice('S'='label.small','L'='label.large') creates 2 radio buttons where the labels are looked up in a message catalog. In this case, the text displayed is looked up from the message catalog, whereas the values saved are the associated values (eg. 'M' or 'L' in this example).
option(0=date.day.long.Sunday,1=date.day.long.Monday,2=date.day.long.Tuesday) creates a drop list for the first 3 days of the week. The text of the days displayed is retrieved from the message catalog whereas the saved data is 0 for Sunday, 1 for Monday etc.
RichText(x) or RichText(x,min,max) where x defines the vertical size (in elements) of the Rich Text data entry widget. (e.g. RichText(10) for a size of 10em). min and max provide validation for the length of the string. e.g. If a value is mandatory then min should be set to a value greater than zero. This widget spans a complete row rather than half a row like the other widgets.
dateAdd - Set to now.
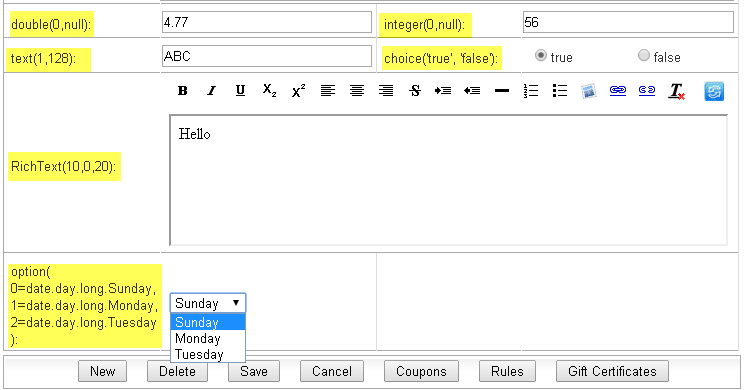
Promotion Configuration Widgets
The above image shows the widgets that are created based on the setFun parameter. In order to display the setFun value being used, it has been added to the label and highlighted in yellow.
In order to see the new promotion module in the Admin App under Modules >> Order Totals we have to add it to the list of Order Total modules in webapps/konakartadmin/WEB-INF/classes/konakartadmin.properties. Remember to match the classname - so be careful with your lower case/upper case characters! Once set, the Admin App will include the new module in the set of modules that can be installed or removed from the system.