Multi-Store functionality is provided as part of the KonaKart Enterprise Extensions.
Before Multi-Store can be configured it must be installed by following the instructions for installing the KonaKart Enterprise Extensions .
Since version 3.0.1.0, the enterprise version of KonaKart can run in multi-store mode. When in this mode, one instance of the KonaKart engine can manage multiple stores. Previous to this version, each store would have required its own instance of the KonaKart engine. Each store still requires its own database schema (i.e. its own instance of database tables).
The instructions that follow, are to set up two stores on localhost using the Tomcat servlet engine in the download kit. Obviously this isn't a production scenario, but will quickly allow you to use two KonaKart stores picking up separate data but running on a single KonaKart deployment. The URLs to access the stores will be :
http://store1.store:8780/konakart/Welcome.action
http://store2.store:8780/konakart/Welcome.action
The first step is to install the KonaKart Enterprise Extensions. It is recommended that you use the automated GUI installation but it is also possible to install manually. During the installation process you are prompted to choose one of the multi-store modes that KonaKart supports. All of the modes are compatible with the following steps that need to be taken.
DNS has to be set up to map store1.store and store2.store to 127.0.0.1. This can be done by editing your hosts file as follows:
127.0.0.1       store1.store
127.0.0.1       store2.store
Note that this is a manual configuration step that is not carried out by the Enterprise Extensions installation.
The Java class com.konakart.actions.BaseAction.java contains a method called getStoreIdFromRequest(). The purpose of this method is to derive the storeId from the HttpServletRequest so that the correct storeId can be passed to the KonaKart engine when it is instantiated. Below you can see an example where the store id is derived from the server name. It returns store1 when the server name is store1.store and store2 when the server name is store2.store. You can find the source for this class in the KonaKart\custom\appn\src\com\konakart\actions directory. Depending on your environment you may need to modify the default implementation. If you do you will also need to follow the instructions for rebuilding the jars that you can find in other parts of the User Guide. There is an ant build file in the KonaKart\custom directory with suitable targets for building and deploying the modified jars.
   /**
     * In a multi-store scenario, you should implement your own logic here to extract the storeId
     * from the request and return it.
     *
     * @param request
     * @return Returns the storeId
     */
    private String getStoreIdFromRequest(HttpServletRequest request)
    {
        /*
         * In multi-store mode we extract the storeId from the serverName attribute of the request.
         * In this simple implementation we look for "storeX.store." and return the first part
         * (storeX in this example) as the storeId.
         */

        if (AppEngServlet.isMultiStore())
        {
            if (request != null && request.getServerName() != null)
            {
                String[] nameArray = request.getServerName().split("\\.");
                if (nameArray.length >= 2 && nameArray[1].equals("store"))
                {
                    return nameArray[0];
                }
            }
        }

        return AppEngServlet.getDefaultStoreId();
    }
Assuming the database tables for store1 and store2 both contain valid data, you should be able to navigate directly to http://store1.store:8780/konakart/Welcome.action and to http://store2.store:8780/konakart/Welcome.action .
In order to configure KonaKart separately for each store, the Admin App now allows you to choose the store before logging in.
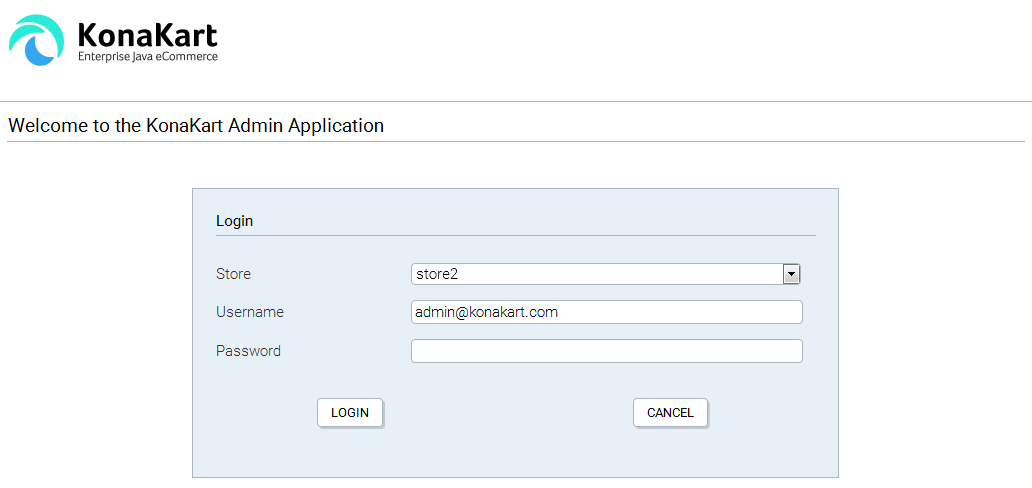
Choose store during login
Once you've logged you will will be able to configure the store that was chosen from the drop down list.
This section describes the functions and configuration options available to a KonaKart administrator once Multi-Store has been successfully installed.
All functionality related to the creation of new stores is only relevant if the Multi-Store Single Database Mode is selected.
The administration panels are made accessible to an Admin App user by virtue of role settings that have to be applied by a Super User of the KonaKart system. By default, following a successful installation of the Enterprise Extensions, the "Super User" user(s) created will have access to the panels described below.
By contrast, the panels discussed below will not be visible in the Admin App (by default) in Single-Store Mode, or Multi-Store Multiple DB modes where the functionality is not available.
Assuming you have sufficient privileges, you can maintain multiple stores on the Multi-Store Management Panel:
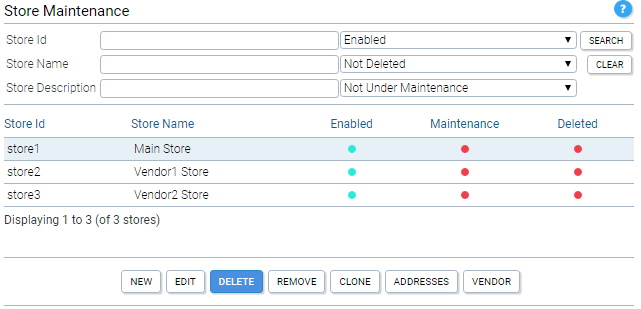
KonaKart Admin Application - Store Maintenance
If you have been granted sufficient privileges, you may search for a store in the mall by entering any combination of the search criteria at the top of the panel then clicking the Search button.
The search is not case sensitive unless your database is configured to be non-case sensitive. Wildcard configuration parameters control the precise searches of substrings (See Configuration>>Admin App Configuration ) but with the default settings a wildcard is added before and after all search text which means that, for example, storeId StoreX will be returned if you enter tor as the StoreId.
In a similar fashion you can search for a store in the mall on whether or not it is enabled or disabled, under maintenance or not under maintenance and whether or not it is marked as deleted.
Only the stores you are authorized to maintain will be returned.
Any displayed stores may be edited or deleted by selecting them in the table then clicking the respective buttons at the bottom of the list assuming the relevant privileges have been granted to the current user.
The user must have edit store privileges for the Edit Store panel in order for the Edit button to be visible.
Creating a New Store - Without Cloning
Note that storeIds must contain no embedded spaces and no special characters that cannot be used when creating directory names.
To create a new store without cloning click the New button whereupon a new panel will be displayed on which you define the attributes for the new store.
Stores can have a number of different statuses. These are defined as follows:
Enabled = active stores that are available for use. If disabled a store is not accessible to application or admin app users.
Under Maintenance = stores that are currently being maintained so are inaccessible to application users, but can be accessed by admin app users.
Deleted = stores that are deleted are no longer available for use by application or admin application users. These stores are not physically deleted from the database but only marked as "deleted". Therefore it is possible to "Un-delete" a store if required simply by changing the deleted status back to false. Note carefully that if you use the "Remove" option this will remove all the records for the selected store from the database (the "Delete" option only marks the store as "Deleted"). A "Remove" operation isn't reversible so use with extreme caution. To enable the "Remove" button you need to enable the removeMallStore API call by setting the "konakart.api.removeMallStore.enabled" property to "true" in the konakartadmin.properties file. As a precaution, by default, this property isn't enabled and hence the "Remove" button will not be enabled.
When a new store is created, the following new users are created:
Multi-Store Single Database - Shared Customers Mode:
One user is created with the Store Administrator's role.
Username
Password
Roles
{new store Id}-admin@konakart.com
princess
KonaKart Store Administrator
Multi-Store Single Database - NON-Shared Customers Mode:
One user is created with the Store Administrator's role, and one user with the Super User role.
Username
Password
Roles
{new store Id}-admin@konakart.com
princess
KonaKart Store Administrator
{new store Id}-super@konakart.com
princess
KonaKart Store Super User
The users created above will have the {new store Id} replaced with the storeId of the new store. Thus, if the new store was called "store3" the new users would be named store3-admin@konakart.com and store3-super@konakart.com as applicable.
The particular role that is assigned to the each user can be defined in the Admin App. You can configure the roles themselves as you wish so that when new stores are created, the users that are created will have only the permissions that you have defined.
In the case of the Non-Shared Customers Mode, where a new "Super User" is created, you can decide to provide these credentials to a "Super User" of the new store or keep them secret.
Creating a New Store - With Cloning
To create a new store by cloning another store, select the row containing the store you wish to clone and click the Clone button whereupon a new dialogue will be displayed on which you define the attributes for the new store.
For cloning you are prompted for the credentials of a user authorized to export data from the store to be cloned.
Differences between "New" and "Clone"
Both the New and Clone options can be used to create a new store. The major difference between the two options is that in the case of the clone, a lot more data is cloned for the new store.
When you create a new store using the "New" option, the following objects are created in the new store:
- Standard users and their respective role assignments (see above).
- Address formats, Countries, Languages, Tax zones, Currencies.
- Order Statuses, Configuration Data.
When you clone a store, using the "Clone" option, in addition to the above, the following objects are exported from the store to be cloned and imported into the new store:
- Products, Categories, Manufacturers, Coupons
- Customer Groups
- Zones, Sub-Zones, Tax Classes, Tax Rates.
- Tags and Tag Groups.
Note that cloning does not include the copying of the following objects:
- Auditing Data, IPN (payment gateway responses).
- Customers, Reviews
- Configuration Groups (this table is no longer used by KonaKart)
You can edit stores using the Edit Store Panel:
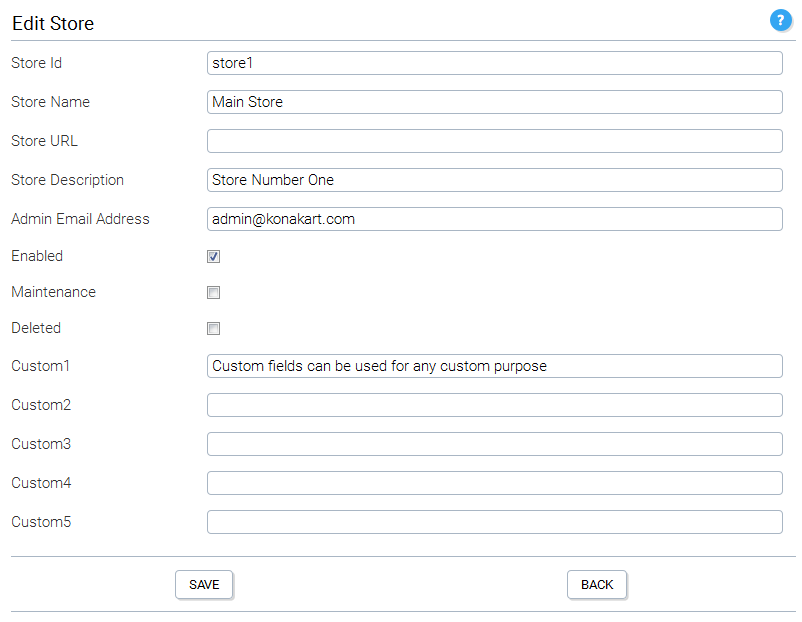
KonaKart Admin Application - Edit or Insert Store
These details will not be of interest to many KonaKart Administrators as they will regard this as an implementation detail but it could be useful when analyzing the database directly for various purposes.
When in MultiStore Single DB Mode (engine mode 2) database tables are shared between stores. In most cases the data is segmented for each store using a store_id column to identify which store the data belongs to. Some tables are shared across all stores so no store_id column is created, whereas some tables are shared only in customer shared or products shared mode.
When tables are "shared" there is either no store_id column on the table to identify which store the data belongs to, or if the store_id column is present, it isn't used.
|
Tables that are Always Shared |
|
|
Tables Shared only when Customers are Shared |
|
|
Tables Shared only when Products are Shared |
|
You can configure the following parameters on the Multi-Store Configuration Panel:
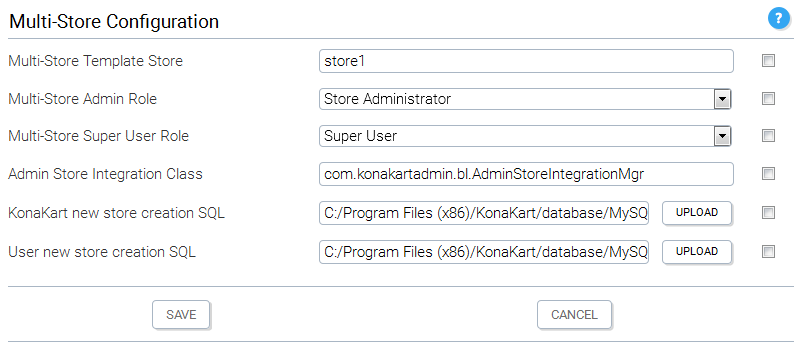
KonaKart Admin Application - Multi-Store Configuration Parameters
These are the configuration variables that are used in a multi-store installation.
You can define the multi-store template storeId to the store whose reports you wish to copy for new stores (in the future, more configuration data may be copied from the template store).
You can define the roles that will be assigned to new users that are created when you create new stores. The number of new users that are created when creating new stores is dependent on whether you are using Shared or Non-Shared Customers. In Shared Customers mode, only a "Store Administrator" user is created, but in Non-Shared Customers mode a "Super User" user is also created. You can change the roles that are assigned for the users and change the roles themselves to configure the permissions granted to new users exactly as you please.
When new stores are created some SQL commands are run to set up the database in various ways. First the "KonaKart new store creation SQL" script is run, then KonaKart loads some set-up data that isn't in any SQL script, then finally this is followed by the execution of the "User new store creation SQL" script. If you need to change the data that is loaded, you should add your SQL commands to the "User new store creation SQL" script and not modify the "KonaKart" script.
Note the following default SQL file names: (If you set up your Multi-Store configuration manually rather than using the automatic installation, you will need to set these up appropriately for your chosen mode. These are set on the Multi-Store Configuration panel for the value labeled "KonaKart new store creation SQL").
- konakart_new_store.sql - for multi-store without sharing customers
- konakart_new_store_cs.sql - for multi-store with shared customers
- konakart_new_store_ps.sql - for multi-store with shared products when customers are NOT shared
For more specialized requirements there is a "hook" function that is called whenever a store is created or modified. If you need special behavior at these points, you have to implement this class in java (default name is com.konakartadmin.bl.AdminStoreIntegrationMgr ) and it will be executed by KonaKart at the appropriate times. Your implementation must implement the com.konakartadmin.blif.AdminStoreIntegrationMgrInterface interface which has the following methods:
package com.konakartadmin.blif;

import com.konakartadmin.app.AdminStore;

/**
 * Used to provide an integration point when a store is added or changed
 */
public interface AdminStoreIntegrationMgrInterface
{
    /**
     * Called whenever a new store is added
     *
     * @param store
     *            The new store
     */
    public void storeAdded(AdminStore store);

    /**
     * Called whenever a store is changed
     *
     * @param oldStore
     *            The store object before the change
     * @param newStore
     *            The new store object after the change
     */
    public void storeChanged(AdminStore oldStore, AdminStore newStore);
}
If required, you can change the name of the class that is instantiated so long as it implements com.konakartadmin.blif.AdminStoreIntegrationMgrInterface and you modify its name in the configuration panel in the Admin Store Integration Class field.
When running in multi-store shared product / shared category mode, the stores may be used to provide pre-production environments where products may be inserted and edited without being made live. This means that sometimes it is useful to run KonaKart in this mode even when you are managing a single store.
The Synchronize Products panel in the Admin App allows you to copy products from the current store to any other defined store. The copy process creates a new product by cloning the current one and inserts it in the destination store. When using KonaKart to provide staging environments, all products must be present in only one store. i.e. You mustn't associate a product with more than one store.
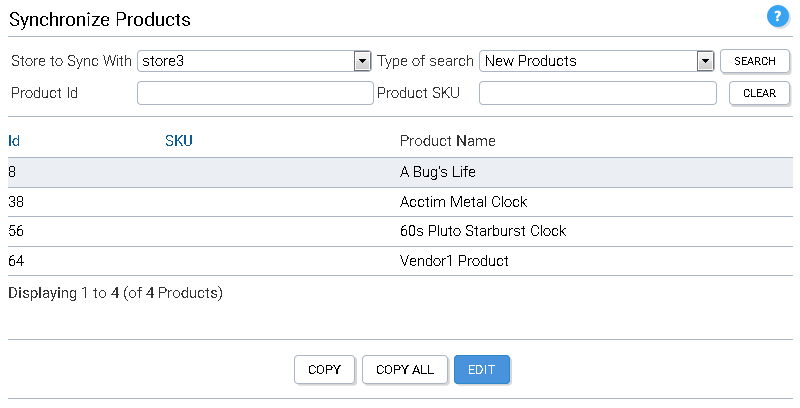
KonaKart Admin Application - Synchronize Products
When searching for products to synchronize, you select from the drop list the store that you want to synchronize with and then from the other drop list you may choose to search for new products or products which are out of sync. New products are products that exist in the current store but have never been copied to the destination store. Out of sync products are products that exist in both stores but have different last modified dates. If you are searching for a single product, you may enter the product id or sku as one of the search filters.
In the case of new products, when you select one and click the copy button, it creates a copy and inserts it into the destination store. When the copy button is clicked for an out of sync product, the existing product in the destination store is edited rather than a new one being inserted. In some cases the product may have associated products such as up-sell, cross sell or bundled products that don't exist in the destination store. The default functionality is to copy over these products as well. You may decide not to copy them by unchecking the check box in the confirmation panel.
When you click the Copy All button, all products (new and out of sync) are copied to the destination store using the batch program in the com.konakartadmin.bl.AdminProductBatchMgr called synchronizeStoresBatch. A log file is created in the log directory defined in the Admin App under Configuration >> Logging. The program runs as a background task and progress may be monitored by clicking on the search button to display the products that haven't been synchronized yet.
When a product is copied from one store to another store, the copied product has a different product id. However each KonaKart product has a UUID attribute whose value is identical for all copies of the same product. There is also a last modified date attribute which is used to determine whether products with identical UUIDs in different stores are synchronized or not. These two attributes allow KonaKart to determine whether a product already exists in the destination store and if it does exist, whether it is in sync.