Once you have java (at least java 8) installed and a database (either pre-loaded with all the necessary tables etc or ready to be loaded), you are ready to install KonaKart itself. To do this, download an installation kit, compatible with your chosen platform, and follow the installation instructions below for your platform :
Note that if the GUI or silent installers do not work on your platform you should download the zip version of KonaKart and follow the manual installation instructions.
Run the set-up program that executes a graphical installation wizard - see Graphical Installation Wizard below. (You can use the "Silent Mode" installation if you prefer, but the graphical version is probably easier if you're installing for the first time).
Create a terminal session on your machine and enter the following: (You may prefer to use commands to do the same thing from your X-desktop if you have one installed).
$# (replace 2.2.6.0 with the version you have downloaded)
$ chmod +x KonaKart-2.2.6.0-Linux-Install
$ ./KonaKart-2.2.6.0-Linux-Install
If you have a graphical environment on your Linux/Unix machine you will be able to run the GUI. In which case see the Graphical Installation Wizard below (identical steps to the Windows installation).
If you don't have a graphical environment you will see this warning message:
$ ./KonaKart-2.1.0.0-Linux-Install
This program must be run in a graphical environment
or in silent, unattended mode (with the -S option).
When running in "silent" (-S) (or "unattended") mode you are able to specify configuration parameters on the command line, for example:
$ ./KonaKart-9.2.0.0-Linux-Install -S                              \
                  -DDatabaseType mysql                             \
                  -DDatabaseDriver com.mysql.jdbc.Driver           \
                  -DDatabaseUrl jdbc:mysql://localhost:3306/mykkdb \
                  -DDatabaseUsername kkdbusr                       \
                  -DDatabasePassword ikk8271                       \
                  -DLoadDB 1                                       \
                  -DJavaJRE "/usr/lib/jvm/java-8-openjdk-amd64/"
Ensure that $HOME is defined before running the silent installer.
The following parameters can be added to the command line, as in the example above, to specify default values for KonaKart at installation time:
|
Parameter |
Default Value |
Explanation |
|
DatabaseType |
mysql |
mysql, postgresql, db2net, oracle, mssql |
|
DatabaseUrl |
jdbc:mysql://localhost:3306/dbname?zeroDateTimeBehavior=convertToNull&useSSL=false (on one line) for MySql 5.7 and 8.0 use jdbc:mysql://localhost:3306/dbname?useUnicode=true&characterEncoding=utf-8&useSSL=false (on one line) |
Database URL |
|
DatabaseUsername |
root |
Database User's Username |
|
DatabasePassword |
Database User's Password | |
|
DatabaseDriver |
com.mysql.jdbc.Driver for MySql 5.7 and 8.0 use com.mysql.cj.jdbc.Driver |
Database Driver |
|
mssqlDBO |
dbo |
Database Owner (only used by MS SQL Server) |
|
InstallationDir |
Windows: C:\KonaKart *nix (as root): /usr/local *nix (as user): ~/konakart |
Installation Directory |
|
LoadDB |
0 |
1=Load DB 0=Do not Load DB |
|
JavaJRE |
The Java runtime location | |
|
PortNumber |
8780 |
KonaKart Port Number |
|
HTTPSPortNumber |
8783 |
KonaKart HTTPS Port Number |
|
SMTPServer |
ENTER_YOUR_SMTP_SERVER_HERE |
SMTP Server |
|
SMTPPort |
25 |
SMTP Server Port |
|
SMTPSecure |
false |
SMTP Server requires authentication? |
|
SMTPStartTLS |
false |
Enable STARTTLS for SMTP email |
|
SMTPUser |
user@yourdomain.com |
SMTP Server Username |
|
SMTPPassword |
SMTP Server password | |
|
sqlEncoding |
utf-8 |
Encoding for files |
|
addToClasspath |
Custom classpath entry |
Note: the value specified for addToClasspath will be added to the installer's classpath (after a classpath separator suitable for the platform) so that it is made available when the installer executes java utilities during the installation process. This can be very handy for specifying a JDBC driver that isn't shipped with KonaKart. This could be useful, for example, for specifying a Microsoft SQL Server JDBC driver for setting up the KonaKart data in a MS SQL Server database.
Note: Only set sqlEncoding if you have encoding problems during the installation on your particular platform. It is not normally required to be set. If you need to set it, choose an encoding that your platform can use (many choices are available including: cp860 cp861 cp862 cp863 cp864 tis-620 cp865 cp866 cp869 dingbats macCentEuro cp874 macUkraine jis0201 macThai iso8859-10 iso2022-jp iso2022 macIceland iso8859-13 iso8859-14 cp737 iso8859-15 iso8859-16 Symbol macRomania gb1988 iso2022-kr macTurkish macGreek ascii cp437 macRoman iso8859-1 iso8859-2 iso8859-3 macCroatian iso8859-4 koi8-r ebcdic iso8859-5 cp1250 macCyrillic iso8859-6 cp1251 iso8859-7 cp1252 koi8-u macDingbats iso8859-8 cp1253 iso8859-9 cp1254 cp850 cp1255 cp1256 identity cp852 cp1257 cp1258 utf-8 cp855 cp775 symbol cp857 unicode).
This shows a typical installation that uses the wizard:
Either double-click on the installation setup program (either KonaKart-2.2.0.4-Windows-Setup.exe on Windows, or KonaKart-2.2.0.4-Linux-Install on Linux - or respective later version numbers) or run it from a command shell (with optional arguments as documented above for the Silent Mode Install). You are first presented with this small window which allows you to confirm that you wish to proceed with the installation:
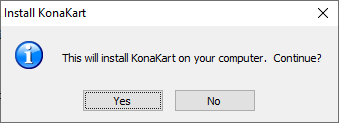
Click on Yes to continue to:
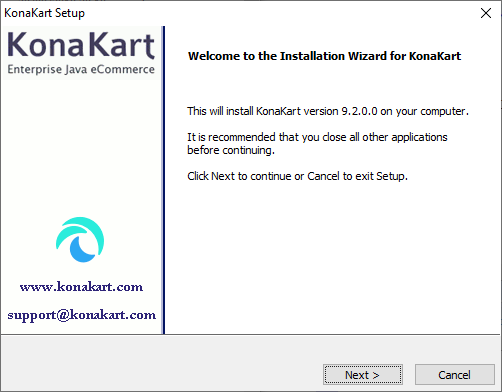
Check that you have the correct version number and click on next to get to the next screen. Note in passing the email address for support questions. Please contact us and / or search the forum if you have any difficulties at all with the installation and we will endeavour to help you as soon as possible.
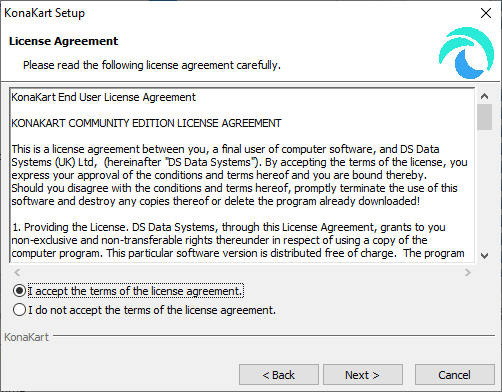
Please read the license agreement carefully and if you are happy to do so under the terms of the agreement, click on the "I accept the terms of the license agreement" bullet and click next to continue. If you are not prepared to accept that license agreement please quit the installation at this point.
Click on next to reach:
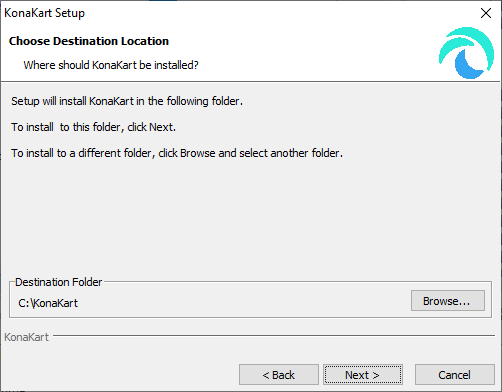
This is where you specify where you want KonaKart to be installed. On Windows this defaults to "C:\KonaKart", on Linux this is the user's home directory (if the user is not root) or "/usr/local" (if the user is root). This can be specified in the silent mode of on the command line of the GUI version using -DInstallationDir.
It is recommended that you accept the default location, but this is not essential.
On clicking next you reach:
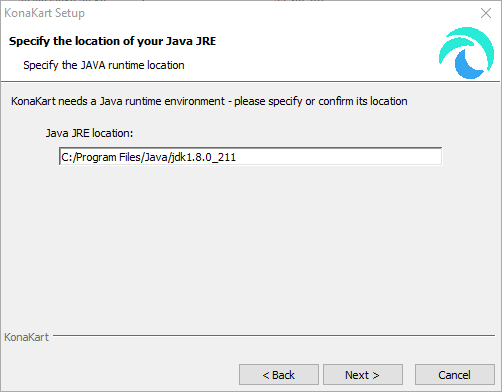
Here you have to confirm or specify the location of the java runtime environment. The wizard will try to find this for you but it is not always successful. In the cases where it isn't successful (or you wish to change its selection) you will have to enter the location manually. If you have installed java v6 in the default location or it appears in your environment's path, the wizard should find it for you.
The java location selected is validated to help you avoid typing errors and will only allow you to proceed in the wizard when it validates the location successfully.
Click on next to get to:
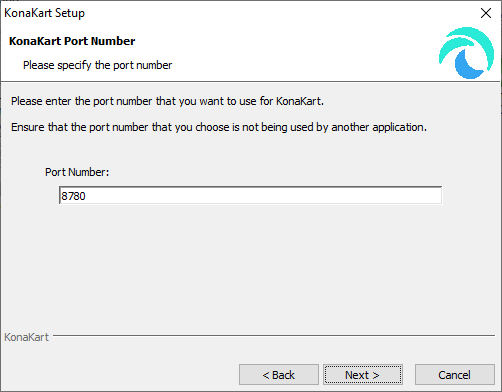
This is where you define the port number that KonaKart will run on. Actually, KonaKart uses Apache Tomcat, so this is the port number that Tomcat is configured to run on. Whilst it is certainly possible to choose another port, it's advisable to accept the default which is 8780. KonaKart will not start up if another application is using the port you select, so make sure the port you select here is not currently being used.
Clicking next moves you on to:
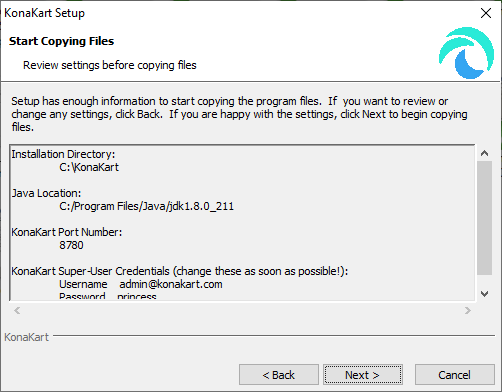
This is your final chance to check your settings before copying the files into position.
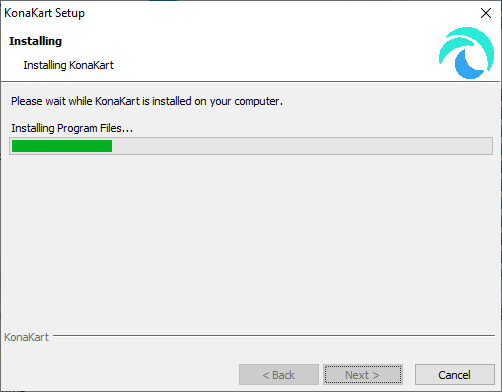
Clicking next will start the process of copying the KonaKart files into position as can be seen on the next screen:
After about a minute or so the file copying will have completed and you are presented with this screen to choose the Database Type that you wish to use:

Choose your preferred database type. You must set up the database yourself - this is not done as part of the installation (see database creation).
Click next to continue to :
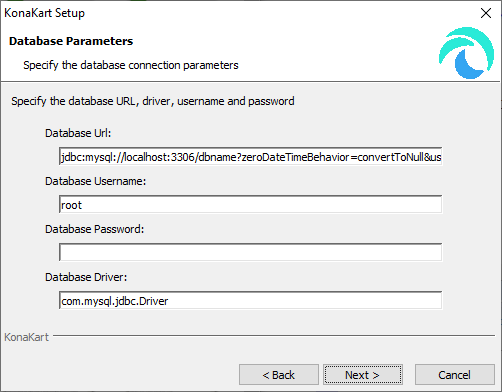
It is very likely that you will have to modify values on this screen. You have to define the database connection parameters to KonaKart for the database that you created earlier (see database creation)
KonaKart currently supports MySQL, PostgreSQL, Oracle, DB2 and MS SQL Server and includes all the JDBC driver jars required to access these.
Note that you must append "?zeroDateTimeBehavior=convertToNull&useSSL=false" to your Database URL if you're using MySQL. Typically, for MySQL, you will need to change "dbname" in the default URL for the name of your own database schema. A good example for such a name might be "store1" or "konakart" but you are free to choose whatever name you like.
After clicking next, the installer will check the database connection and report the results on the next screen as follows. For an unsuccessful connection you will see something like this:
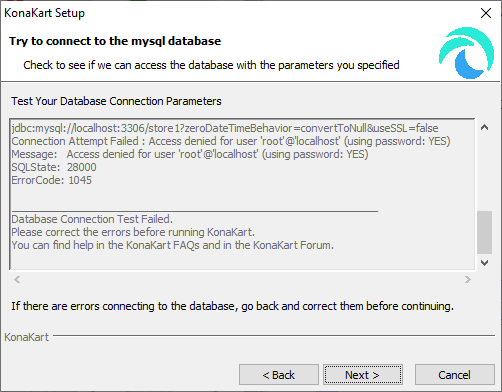
At this point you can go back and modify the database connection parameters and then click next to try the database connection test again. If successful you will see a screen like this:
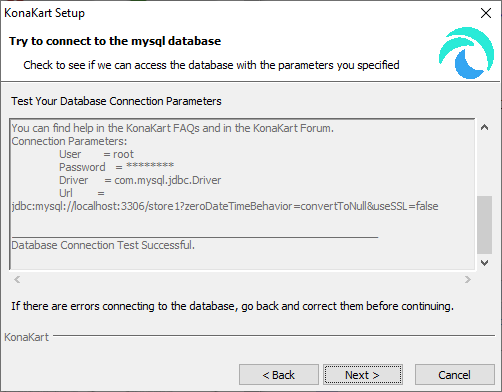
If the database connection fails, you can choose to click on next and finish the installation without executing the database initialisation. Normally, for a fresh install, you are advised to correct your database connection parameters so that you see a successful database connection message, then proceed to the database initialisation screen which looks like this:
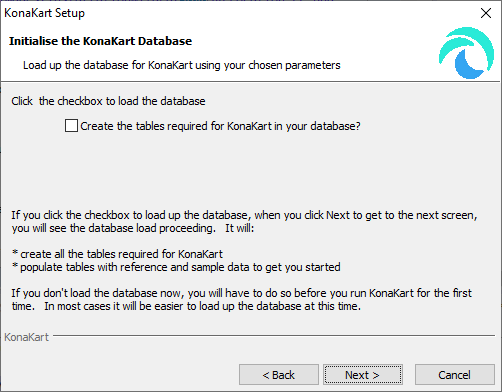
Note that the default is that the database initialisation is NOT executed. To execute it you must click on the checkbox and click next to reach the next step.
Be warned that the database initialisation script will drop and re-create all the KonaKart tables and populate them with a default set of starting data. This default starting position is ideal for users who are setting up KonaKart for the first time but this is probably not what you want to do if you already have a KonaKart database with a product catalog loaded for your store.
If you do not check the 'Create the tables..' box then click next you would jump to the final page of the wizard. Alternatively, if you do check the 'Create the tables...' box then click next, you will be presented with a screen that shows the loading of the database initialisation script in a scolling window which will look like this:
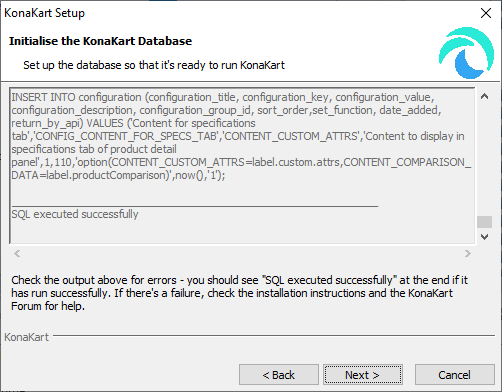
In the above example the script ran successfully (see last comment "SQL executed successfully" in the scrollable text area). If the script does not run successfully you will see the error message in this window.
After clicking next you reach the following screen:
Finally you are congratulated on a successful installation on the final screen of the wizard:
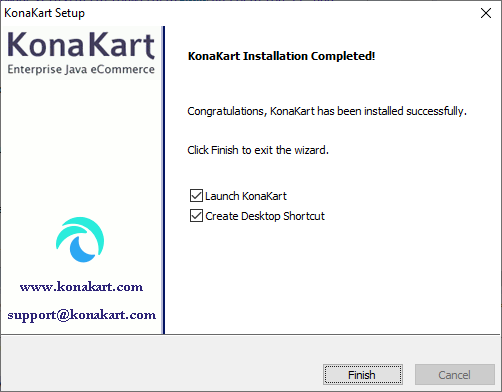
Finally you have the option to create a desktop icon (which is defined to start the KonaKart server and launch the GUI) and launch the application immediately after the installation has completed. The "Launch KonaKart" option executes a startup of the KonaKart server and then launches the default browser to show the KonaKart UI, and the KonaKart Administration Application.