An exportOrder API call is available for exporting a specified Order to a file.
The exportOrder interface requires an options parameters that is used to define the type of export to execute. Two examples that can be used for this code are:
- KKConstants.EXP_ORDER_FULL_ORDER_TO_XML
- KKConstants.EXP_ORDER_BY_SHIPPING_MODULE
When the KKConstants.EXP_ORDER_BY_SHIPPING_MODULE code is used, the idea is that the shipping module should provide an implementation of the order export that is specifically designed for integration with a shipping application for that shipping gateway.
An example of such a shipping module exportOrder implementation is provided for UPS for integration with UPS WorldShip. In this case the KonaKart order is exported as an XML file suitable for use with the Auto-Import feature of UPS WorldShip. The operator of UPS WorldShip should configure the Auto-Import directory (in UPS WorldShip) to be the directory where KonaKart exports its orders (by default, for store1 and UPS, this is under the KonaKart home directory in: orders/store1/2/ups/ where "2" is the value of the EXP_ORDER_BY_SHIPPING_MODULE constant, "ups" is the shipping module code, and "store1" is the storeId).
Two export order functions are available on the Orders panel of the Administration Application. These two export order functions correspond to the two export codes listed above (EXP_ORDER_FULL_ORDER_TO_XML and EXP_ORDER_BY_SHIPPING_MODULE). These functions are useful for ad-hoc order exports.
In some implementations of KonaKart it may be useful to export orders during normal order processing (rather than relying on manual intervention for this). There are many ways to implement the automatic export of orders. A common technique would be to use the OrderIntegrationMgr and AdminOrderIntegrationMgr to export orders whenever the order's status reached a certain value (such as "payment_received"). An example of doing just this is provided in the OrderIntegrtaionMgr source code and all that is required to get it to work is to uncomment the calls.
XML_IO is a tool, provided in the Business and Enterprise Editions of KonaKart, that allows you to import and export KonaKart data in XML files.
Note the Warning section below. XML_IO does import compliant XML data files but in a specific way which may not be appropriate for your needs. Since KonaKart has a complete set of Administration APIs most users find it more flexible to write their own import/output routines (using the KonaKart KKAdminIf APIs) designed for their own specific-purposes than using the generic XML_IO facility.
It can be found in the xml_io directory which is located directly under the KonaKart installation directory.
The XML_IO utility can be configured to backup KonaKart systems, transfer product data from one system to another (e.g. from some kind of staging system to the live system), or any other use you can think of involving the import and export of XML data!
For some users it may be a useful way to export products or orders in XML format for subsequent communication with other systems. Indeed it could also be a useful way to import customers or products into KonaKart that are defined in other systems that can produce compatible XML files.
These are merely examples and it is expected that users will end up using the XML_IO utility in many different ways to suit their own specific requirements.
A properties file allows you to define which KonaKart data objects you would like to be imported or exported providing tremendous flexibility of usage.
The properties file allows you to define the following:
When not modified, the default setting is true.

#accessoryProducts     = false
#addressFormats        = false
#audit                 = false
#bundledProducts       = false
#categories            = false
#categoriesToTagGroups = false
#configurationGroups   = false
#configurations        = false
#content               = false
#contentTypes          = false
#countries             = false
#coupons               = false
#crossSellProducts     = false
#customerGroups        = false
#customerTags          = false
#customerTagsForCusts  = false
#currencies            = false
#customers             = false
#dependentProducts     = false
#digitalDownloads      = false
#expressions           = false
#geoZones              = false
#ipnHistory            = false
#languages             = false
#manufacturers         = false
#messages              = false
#productOptions        = false
#orders                = false
#orderStatuses         = false
#productCategories     = false
#productOptionValues   = false
#products              = false
#productsToStores      = false
#productTags           = false
#reviews               = false
#subZones              = false
#tagGroups             = false
#tagGroupToTags        = false
#tags                  = false
#taxClasses            = false
#taxRates              = false
#upSellProducts        = false
#wishLists             = false
#zones                 = false
The properties file allows you to define the data to be imported/exported using the Xml_IO import/export utility in KonaKart. You can call the properties file anything you like as its name is specified as an argument to the XML_IO command line utility (for details of the "usage" of the command line utility, see below).
If no properties are defined (or a properties file is not specified to the XML_IO utility) the default import/export configuration is used. By default all values are set to true. This means that by default all data is imported/exported. ** Note that this may take a long time if if you have a lot of data!
If you define properties in this configuration properties file the values in it will override the default settings of the XML_IO utility.
A sample file is provided in the download kit for you to modify for your own purposes. Uncomment only the fields you want to define for import/export.
If you leave them commented out "true" is used by default.
If you are planning to import your exported data into another system where the Ids of the data are different, you should ensure that you export the appropriate dependent data objects (see below for some warnings about mapping of Ids). If, on the other hand, you are planning to import the exported data into a system where you know the Ids of the referenced objects will be the same, you can improve the performance of the export/import process by choosing only the higher level objects for export and import. If in doubt, you should export and import all the data objects so that you know you have a complete set of data for the site.
You can discover the parameters for the XML_IO command line utility by issuing a "-?" as your argument as follows (example from a Linux system):
summersb@luton:~/konakart/xml_io$ . ./setClasspath.sh
summersb@luton:~/konakart/xml_io$ ${JAVA_HOME}/bin/java -cp ${IMP_EXP_CLASSPATH} \
                                  com.konakart.importer.xml.Xml_io -?
Usage: Xml_io
     (-i|-o)              Import or Export
     [-b bootstrapFile]   Bootstrap file - an sql file run prior to importing
                          data to initialise the DB. If not set no bootstrap
                          is executed.
     [-e emptyDBFile]     An sql file used that's run prior to importing data
                          to empty the DB. If not set no empty DB is executed.
     [-r xmlRootDir]      Root directory of the XML data files on disk.
                          Default: ./xml_io
                          The directory is created if it doesn't exist.
     [-prop propsFile]    Konakart Admin properties file name which must be
                          on the classpath. Default:
                          konakartadmin.properties
     [-conf confFile]     Configuration file that defines which parts of the
                          KonaKart database are imported/exported.
     [-usr userName]      User name to access the Konakart Admin engine.
                          Default: admin@konakart.com
     [-pwd password]      Password to access the Konakart Admin engine.
                          Default: princess
     [-s storeId]         The store to import to or export from.
                          Default: store1
     [-m engineMode]      KonaKart Engine Mode
                          0 = Single Store (default)
                          1 = Multi Store MultipleDB
                          2 = Multi Store SingleDB
     [-c (true|false)]    Shared customers (only relevant in Engine Mode 2).
                          Default is false.
     [-ps (true|false)]   Shared products (only relevant in Engine Mode 2).
                          Default is false.
     [-cas (true|false)]  Shared categories (only relevant in Engine Mode 2).
                          Default is false.
     [-soap]              Use SOAP to access the Admin Engine.
                          Default is to use direct java calls
     [-ws url]            The endpoint for the Admin Web Services. Default:
                          http://localhost:8780/konakartadmin/services/KKWSAdmin
                          Only relevant when -soap is specified
     [-d]                 to enable debug
     [-h|-?]              to show usage information
A word of warning when using the XML_IO utility! Loading data from one system to another can be a very complicated process so proceed with extreme caution. It is suggested that you backup your systems before executing XML_IO imports in the event that an import doesn't function the way you expect.
Complications arise in a number of different areas. One is in the case where exported Ids (and keys) from one system do not match those on the target system to import into. The XML_IO utility does have the "intelligence" necessary to "map" these ids during the import process and does this in a number of different ways. One way to ensure the mappings are correct is to include the necessary reference data in the XML_IO export so that this can be used during the import process by XML_IO to figure out the correct mappings. An example is to include the languages export when you export the products so that when the products are subsequently loaded into a different system (where languages could easily be defined with different Ids) the language Ids can be mapped on the imported products.
Nevertheless, it is important to note that even when you include all the necessary reference data there are, unavoidably, occasions when XML_IO cannot calculate a mapping successfully. This can occur, for example, when it tries to locate a language by name in the target system (in order to figure out the mapping of Ids) but fails to find exactly one match. In such cases the XML_IO utility will report the mapping failure as a "Warning" in the log.
Therefore, it is strongly advised that you check your import/export processes carefully before unleashing in production. XML_IO is a very powerful utility but if used incorrectly can lead to duplicate records and in some cases a loss of integrity in your database.
KonaKart has a complete set of Administration APIs so most users find it more flexible to write their own import/output routines designed for their own specific-purposes than using the generic XML_IO facility.
In the xml_io directory, located under the KonaKart installation home directory, you will find some example scripts for running XML_IO either directly using the "engine" or via SOAP. These may be useful as they stand or they could be used as templates for your own XML_IO scripts that are tailored for your own particular environment.
The Business and Enterprise Editions of the Administration Application provides an Importer Panel that allows you to define your own custom Import routines that you can assign to custom import buttons.
There are three custom import buttons available for three custom commands. An example import routine is provided and set up on custom import button number 1. This example imports products from an XML file (that you select before clicking on Import) whose format definition can be found under the installation home in "\xml_io\schema\konakart_xml_io.n.n.n.n.xsd" (refer to AdminProductsXML).
Note that this particular import is just a simple example. It only imports products with SKUs that are not specified or do not already exist in the KonaKart database. It does not update products at all. It does not attempt to match the names of referenced objects but just uses the Ids specified in the data file. If, for example, a product's manufacturer Id refers to a manufacturer that doesn't exist, the product insert will fail.
The example is provided just to give you a starting point for your own custom import routines and show you how to make them accessible to your Admin users. It is likely that you will have specific requirements for your imports that will not be satisfied by this simple example.
The example source code can be found under the installation home at "xml_io/src/com/konakart/importer/xml/ImportXml.java"
Using File-based configuration (in konakartadmin_gwt.properties) you can define any custom import routine to be associated with each of the three import buttons.
For example, by default, the example import routine is set up on custom import button 1:
#--------------------------------------------------------------------
#
# Importer Configuration
#
#--------------------------------------------------------------------
#
# Allows you to specify custom jobs on each of the 3 Custom Import
# buttons.
#
# Enterprise Only
#
# Set the custom import button labels in the AdminMessages.properties file
# for each of your supported languages in these properties:
#
# button.importer.custom1
# button.importer.custom2
# button.importer.custom3
#
# If the job class is undefined for a Custom Import button
# it will not be shown on the Importer Panel.
#------------------------------------------------------------------------------

fbc.import.custom1.job.class   = com.konakart.importer.xml.ImportXml
fbc.import.custom1.job.method  = importXml

#fbc.import.custom2.job.class   = custom2.class
#fbc.import.custom2.job.method  = custom2.method

#fbc.import.custom3.job.class   = custom3.class
#fbc.import.custom3.job.method  = custom3.method
Your custom routine must have a constructor that takes a KKAdminIf object and the method that you specify must receive an array of Strings. For example:
   /**
     * Constructor that takes an Admin Engine
     *
     * @param adEng
     *            KKAdminIf engine
     */
    public ImportXml(KKAdminIf adEng)
    {
        // You will probably want to save the engine:
        setAdminEng(adEng);
    }

    /**
     * ImportXml using the specified command line args
     *
     * @param args arguments:  will be called by the Admin App with:
     *             -se sessionId (of the logged-in admin user)
     *             -i  comma-separated list of filenames or directories
     *             -o  log-filename
     *
     * The log filename will use a concatenation of the selected files
     * with a file-friendly timestamp and ".log" appended.
     */
    public void importXml(String[] args)
    {
      // Add your custom import code !
    }
As for all button labels, the custom import button labels are defined in the AdminMessages.properties file for each supported language. The default (English) version defines these:
button.importer.custom1         = Import
button.importer.custom2         = Import2
button.importer.custom3         = Import3
By default the Importer Panel appears as follows: (showing the online help as well):
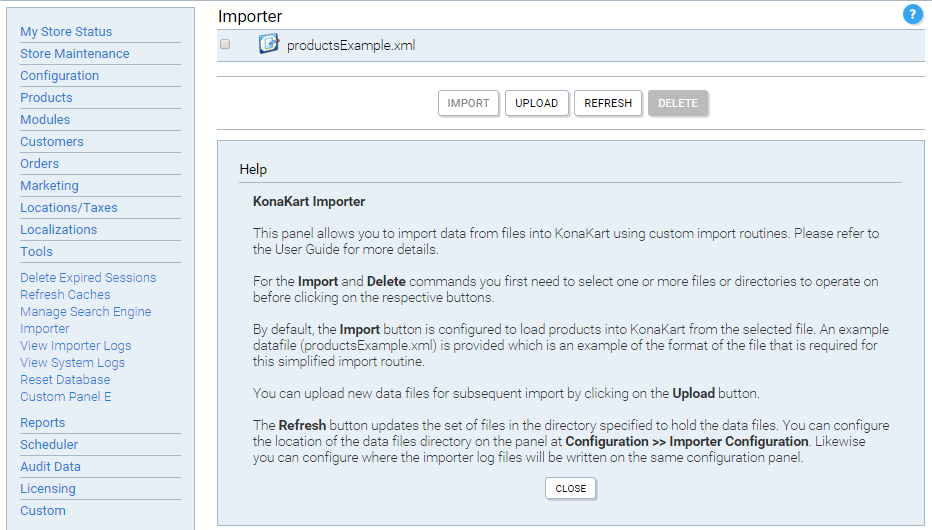
Importer Panel - also showing the on-line help
The Business and Enterprise Editions of the Administration Application provides a Reset Database Tool that can be executed to reset your KonaKart database to a state containing just a minimal set of reference data (and customers) ready for you to add your own categories, manufacturers and products.
Therefore, it should be used with extreme care. Do not remove all your products by accident!
You can replace the name of the command on the Tools menu with the name of a custom tool of your own specification and change the definition of the class and method that is executed to change what happens when that option is selected.
Using File-based configuration (in konakartadmin_gwt.properties) you can define any custom routine to be associated with the Reset Database option.
By default, if the values in the konakartadmin_gwt.properties are commented out, the emptyDatabase method of the com.konakartadmin.utils.ResetDatabase class is executed. You can specify your own values here instead to change the functionality:
#--------------------------------------------------------------------
#
# Tools Configuration
#
# --------------------------------------------------------------------
#
# Allows you to specify a custom tool to replace the Reset Database
# operation.
#
# Enterprise Only
#
# Specify your own class and method to repace the Reset Database
# operation with your own.
# Default values are shown commented out
#
#------------------------------------------------------------------------------

#fbc.tools.resetdb.job.class   = com.konakartadmin.utils.ResetDatabase
#fbc.tools.resetdb.job.method  = emptyDatabase
Your custom routine must have a constructor that takes a KKAdminIf object and the method that you specify must recieve an array of Strings. For example:
   /**
     * Constructor that takes an Admin Engine
     *
     * @param adEng
     *            KKAdminIf engine
     */
    public ResetDatabase(KKAdminIf adEng)
    {
        // You will probably want to save the engine:
        setAdminEng(adEng);
    }

    /**
     * Empty Database using the specified command line args
     *
     * @param args arguments:  will be called by the Admin App with:
     *             -se sessionId (of the logged-in admin user)
     *             -o  output-filename
     *
     * The output filename will use the method name that you define
     * with ".log" appended so in the case of the default example,
     * this is emptyDatabase.log
     */
    public void emptyDatabase(String[] args)
    {
      // Add your custom code !
    }
As for all Admin Application messages, the Reset database messages can be changed by modifying the following properties in the AdminMessages.properties file for each supported language. The default (English) version defines these:
panel.resetDatabase         = Reset Database
question.resetDatabase      = Are you sure you want to Reset the Database?
msg.resetDatabase           = Click on the Delete button to empty your database of
                              Products\, Categories\, Orders and other important data
                              items (see the Help for more details).<br /><br /><b>PROCEED
                              WITH CAUTION</b> - do not Click on Delete unless you are
                              sure you want to reset your database...
msg.resettingDatabase       = Resetting Database...
help.resetDatabase          = Reset the Database
You can also change the help text that is associated with the panel by changing the help.resetDatabase property in the various AdminHelpMessages.properties files.
By default the Reset Database option appears as follows: (after clicking on the Delete button you get a warning before proceeding):
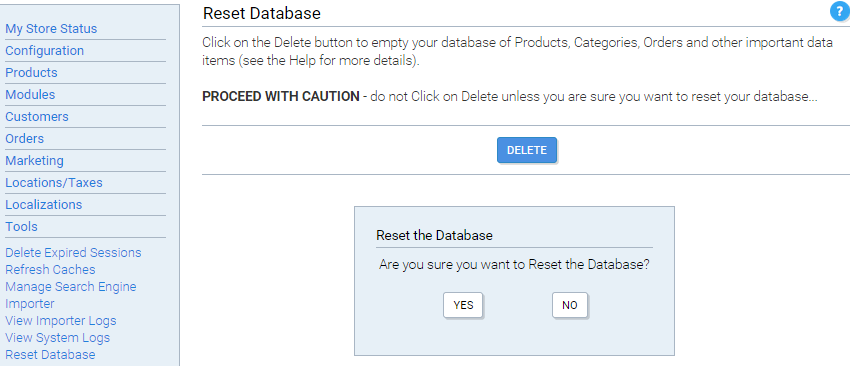
Reset Database Panel - with warning dialog